How to Read Http Response in Java
In this chapter, we will implement the Deserialization of JSON Responses we receive. It helps us to read the torso of the response. After, in this process of deserialization, we will Convert JSON Response Torso to Java Objects . Information technology is also known as Object Representation of JSON responses.
Additionally, to learn more almost the deserialization of JSON response, nosotros will recommend yous to go through the Deserialize JSON Response .
Nosotros will follow the below steps to achieve the deserialization of our responses in the framework. We followed them in the previous affiliate of Convert JSON Asking Torso to Java Object besides.
- Create POJO classes for each of our Response Objects:
- Book
- Books
- Token
- User Business relationship
- Replace the Response bodies in Step files with POJO class objects
- Run the tests
Convert JSON Response Body to Coffee Object
Firstly, we demand to catechumen the JSON Response into a POJO class for our response object. And then, let us learn to create a POJO class out of a JSON Response. Nether deserialization, we will study our JSON trunk parameters and create a POJO class of information technology. Let'due south begin with a straightforward asking example for Get A Book asking:
Create POJO class Book
Every bit a function of this request, nosotros are sending the ISBN parameter to get details of a specific book.
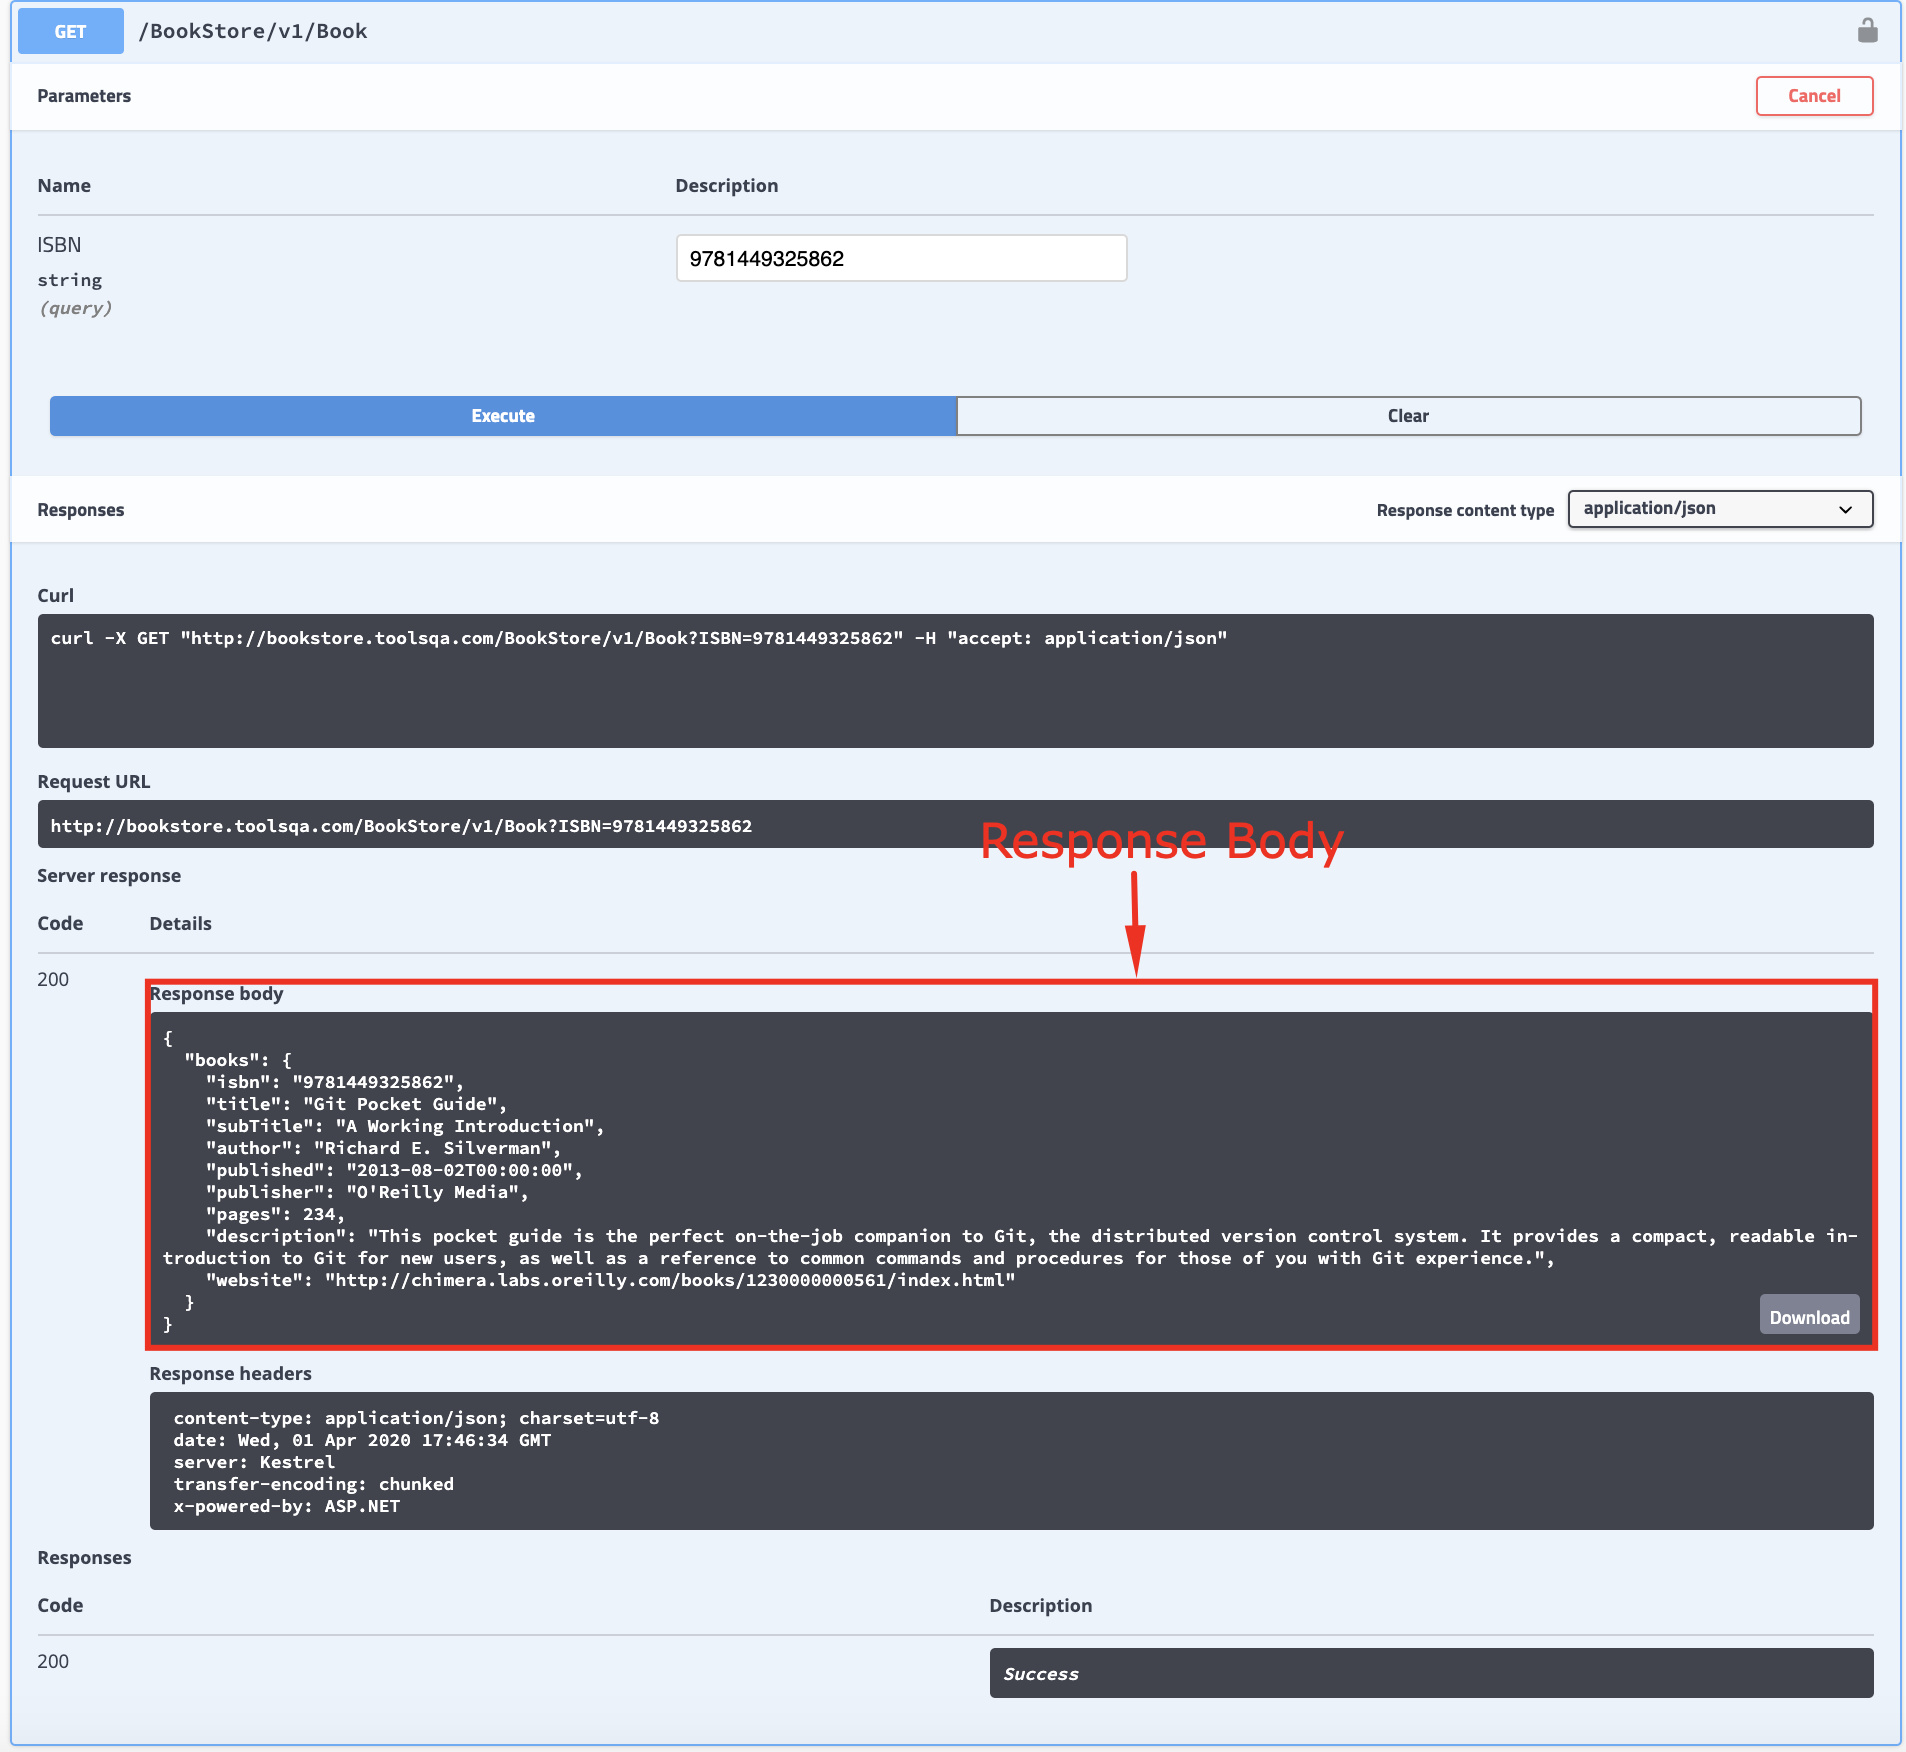
Consequently, the response body from the Swagger Bookstore API , as highlighted in the to a higher place paradigm is:
{ "books": [ { "isbn": "9781449325862", "title": "Git Pocket Guide", "subTitle": "A Working Introduction", "author": "Richard Due east. Silverman", "published": "2013-08-02T00:00:00", "publisher": "O'Reilly Media", "pages": 234, "clarification": "This pocket guide is the perfect on-the-job companion to Git, the distributed version control system. It provides a compact, readable introduction to Git for new users, as well as a reference to common commands and procedures for those of you with Git experience.", "website": "https://chimera.labs.oreilly.com/books/1230000000561/index.html" } } As a part of the next step, we will create a POJO class for our response object. Additionally, you may use the aforementioned online utility , as we discussed in the previous chapter, to convert the response to a POJO class.
To create a POJO class of it, follow the below steps:
1. Firstly, Correct-click on the model Package under the apiEngine package. Later that, select New>>Class . Proper name it as Book. Moreover, we volition capture the volume response under this class.
Book.course
package apiEngine.model; public form Book { public String isbn; public String championship; public String subTitle; public String author; public Cord published; public Cord publisher; public int pages; public String description; public Cord website; } Code Explanation
This Book form volition comprise all the fields we got in the response, such as title, isbn, author, no.of pages, etc.
Create a POJO form for Books Response Object:
The response body from the Bookstore API, every bit highlighted in the below paradigm is:
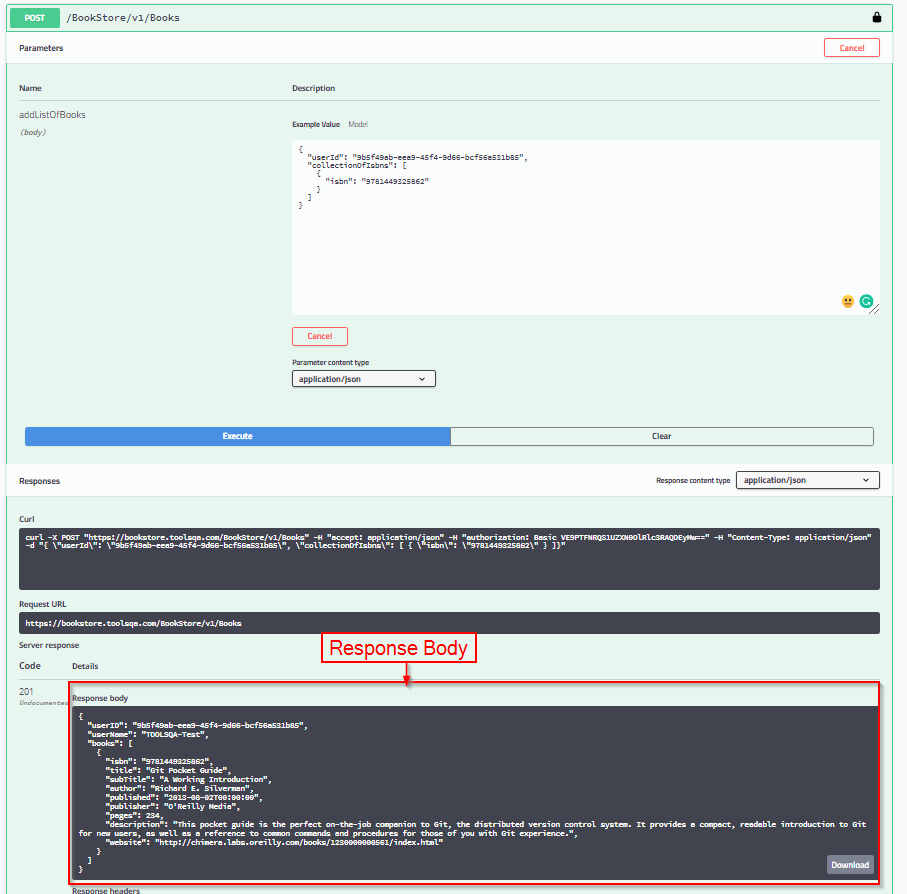
{ "userID": "9b5f49ab-eea9-45f4-9d66-bcf56a531b85", "userName": "TOOLSQA-Exam", "books": [ { "isbn": "9781449325862", "title": "Git Pocket Guide", "subTitle": "A Working Introduction", "author": "Richard Due east. Silverman", "published": "2013-08-02T00:00:00", "publisher": "O'Reilly Media", "pages": 234, "description": "This pocket guide is the perfect on-the-job companion to Git, the distributed version control system. It provides a compact, readable introduction to Git for new users, as well as a reference to common commands and procedures for those of you with Git feel.", "website": "https://chimera.labs.oreilly.com/books/1230000000561/index.html" } ] } Note: As a part of the response body, we got the volume details of the volume nosotros added for the user every bit well as other user details such as userName and userID.
To create a POJO grade of it, follow the beneath steps:
-
Firstly, in this model Package, Right-click on the model and select New >> Package. Proper name it as responses. Additionally, we volition capture all the response classes under this bundle.
-
Secondly, Correct-click on the above-created responses Package and select New >> Class . Name it equally Books.
Books.class
package apiEngine.model.responses; import java.util.List; import apiEngine.model.Volume; public class Books { public Listing<Book> books; } Code Explanation Nosotros created the course Books to hold a list of the type Book which we receive in the JSON response in GET Books Request.
Create a POJO class for Token Object:
We have understood the process of creating a POJO class by now, equally shown in the higher up examples. And then, in the next APIs, I will direct add together the POJO of respective API'south. Consequently, the response body for Generate Token API from our Bookstore API is:
{ "token": "string", "expires": "2020-03-14T13:42:fifteen.716Z", "condition": "string", "result": "cord" } To create a POJO grade of information technology, Right-click on the higher up-created responses Package and select New >> Course . Subsequently that, name it as Token .
package apiEngine.model.responses; public course Token { public String token; public Cord expires; public String status; public String upshot; } Code Explanation
We created the course Token that will incorporate all the fields we got in the response field, namely, token, expiry, status, and a result which we receive in the JSON response of GenerateToken.
Create a POJO class for User Business relationship Object:
Similarly, for User Business relationship API, the response trunk is:
{ "userID": "9b5f49ab-eea9-45f4-9d66-bcf56a531b85", "userName": "TOOLSQA-Test", "books": [] } To create a POJO class of the response body, Right-click on the in a higher place-created responses Parcel. Afterward that, select New >> Class . Name it equally UserAccount .
package apiEngine.model.responses; import coffee.util.List; import apiEngine.model.Book; public class UserAccount { public String userID; public Cord userName; public List<Book> books; } Code Explanation
Nosotros created the form UserAccount to hold the information associated with the user account, such as books associated with the user, the userID, and userName.
Every bit our next step of project implementation, nosotros shall modify our Steps grade.
Supervene upon the Response bodies in Step files with POJO class objects
Now it is the time to make employ of the POJO classes created to a higher place in the examination code. Let's have a look at the one of the old cucumber step below in the Step Definition:
@Given("^I am an authorized user$") public void iAmAnAuthorizedUser () { AuthorizationRequest credentials = new AuthorizationRequest("TOOLSQA-Examination","[email protected]@123"); RestAssured.baseURI = BASE_URL; RequestSpecification request = RestAssured.given(); request.header("Content-Blazon", "application/json"); response = asking.trunk(credentials).post("/Account/v1/GenerateToken"); Cord jsonString = response.asString(); //We will deserialize the Response body into Token Response token = JsonPath.from(jsonString).get("token"); } we update information technology likewise:
@Given("^I am an authorized user$") public void iAmAnAuthorizedUser () { RestAssured.baseURI = BASE_URL; RequestSpecification request = RestAssured.given(); asking.header("Content-Type", "application/json"); AuthorizationRequest authRequest = new AuthorizationRequest("TOOLSQA-Test", "[e-mail protected]@123"); response = request.body(authRequest).mail service("/Business relationship/v1/GenerateToken"); // Deserializing the Response torso into tokenResponse tokenResponse = response.getBody().as(Token.class); } Note The import statement: import io.restassured.path.json.JsonPath; is no longer needed as we have deserialized our response to Token form.
Lawmaking Explanation: We deserialized the response body into the Token form in this footstep above. This response trunk gets saved in the " tokenResponse " variable. The saved variable will be used further in a request forth with the token.
Nosotros put together these code snippets for our Steps file:
bundle stepDefinitions; import java.util.List; import java.util.Map; import org.junit.Assert; import apiEngine.model.Book; import apiEngine.model.requests.AddBooksRequest; import apiEngine.model.requests.AuthorizationRequest; import apiEngine.model.requests.ISBN; import apiEngine.model.requests.RemoveBookRequest; import apiEngine.model.response.Books; import apiEngine.model.response.Token; import apiEngine.model.response.UserAccount; import io.cucumber.java.en.Given; import io.cucumber.java.en.Then; import io.cucumber.java.en.When; import io.restassured.RestAssured; import io.restassured.path.json.JsonPath; import io.restassured.response.Response; import io.restassured.specification.RequestSpecification; public class Steps { private static final String USER_ID = "9b5f49ab-eea9-45f4-9d66-bcf56a531b85"; private static final String BASE_URL = "https://bookstore.toolsqa.com"; private static Response response; private static Token tokenResponse; individual static Book book; @Given("I am an authorized user") public void iAmAnAuthorizedUser () { AuthorizationRequest credentials = new AuthorizationRequest("TOOLSQA-Test","[email protected]@123"); RestAssured.baseURI = BASE_URL; RequestSpecification request = RestAssured.given(); request.header("Content-Blazon", "application/json"); response = request.body(credentials).mail("/Business relationship/v1/GenerateToken"); // Deserializing the Response body into tokenResponse tokenResponse = response.getBody().as(Token.form); } @Given("A list of books are available") public void listOfBooksAreAvailable () { RestAssured.baseURI = BASE_URL; RequestSpecification request = RestAssured.given(); response = request.go("/BookStore/v1/Books"); // Deserializing the Response trunk into Books class Books books = response.getBody().as(Books.class); book = books.books.get(0); } @When("I add together a book to my reading listing") public void addBookInList () { ISBN isbn = new ISBN(volume.isbn); AddBooksRequest addBooksRequest = new AddBooksRequest(USER_ID, isbn); RestAssured.baseURI = BASE_URL; RequestSpecification asking = RestAssured.given(); request.header("Authorization", "Bearer " + tokenResponse.token) .header("Content-Type", "application/json"); response = asking.body(addBooksRequest).post("/BookStore/v1/Books"); } @So("The volume is added") public void bookIsAdded () { Affirm.assertEquals(201, response.getStatusCode()); UserAccount userAccount = response.getBody().every bit(UserAccount.class); Assert.assertEquals(USER_ID, userAccount.userID); Assert.assertEquals(book.isbn, userAccount.books.go(0).isbn); } @When("I remove a book from my reading list") public void removeBookFromList () { RestAssured.baseURI = BASE_URL; RequestSpecification request = RestAssured.given(); RemoveBookRequest removeBookRequest = new RemoveBookRequest(USER_ID, book.isbn); request.header("Dominance", "Bearer " + tokenResponse.token) .header("Content-Type", "application/json"); response = request.torso(removeBookRequest).delete("/BookStore/v1/Book"); } @Then("The book is removed") public void bookIsRemoved () { Affirm.assertEquals(204, response.getStatusCode()); RestAssured.baseURI = BASE_URL; RequestSpecification asking = RestAssured.given(); request.header("Authorization", "Bearer " + tokenResponse.token) .header("Content-Blazon", "application/json"); response = request.get("/Account/v1/User/" + USER_ID); Affirm.assertEquals(200, response.getStatusCode()); UserAccount userAccount = response.getBody().equally(UserAccount.class); Affirm.assertEquals(0, userAccount.books.size()); } } Run the Cucumber Examination
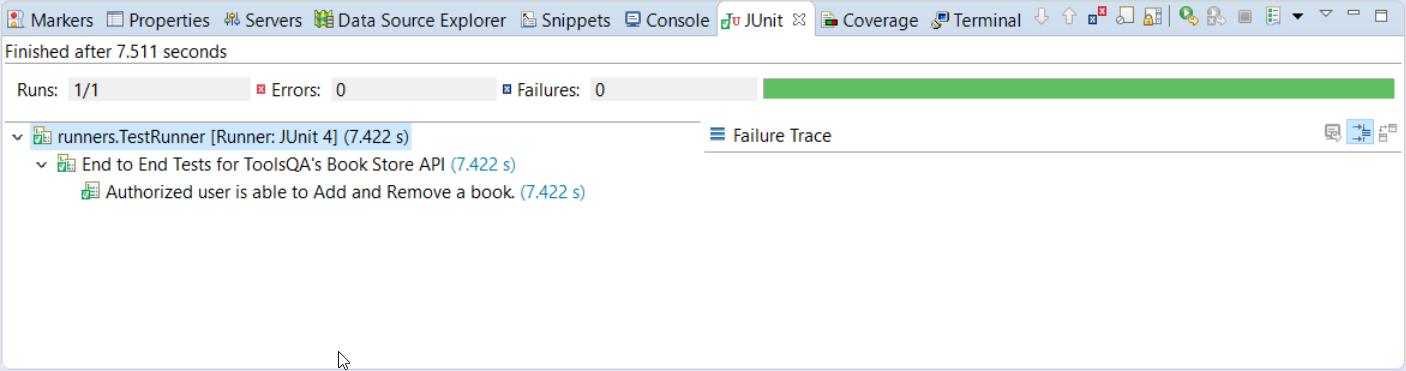
Run the Tests as JUnit
We are all gear up now to run the updated Cucumber examination. First, Correct -Click on TestRunner class and Click Run As >> JUnit Test. Cucumber runs the script in the same way as Selenium WebDriver. Consequently, the result will display in the JUnit tab of the console.
Run the Tests from Cucumber Feature
To run the tests as a Cucumber Feature, right-click on the End2End_Test.feature file. After that, select the Run Equally>>Cucumber Feature.
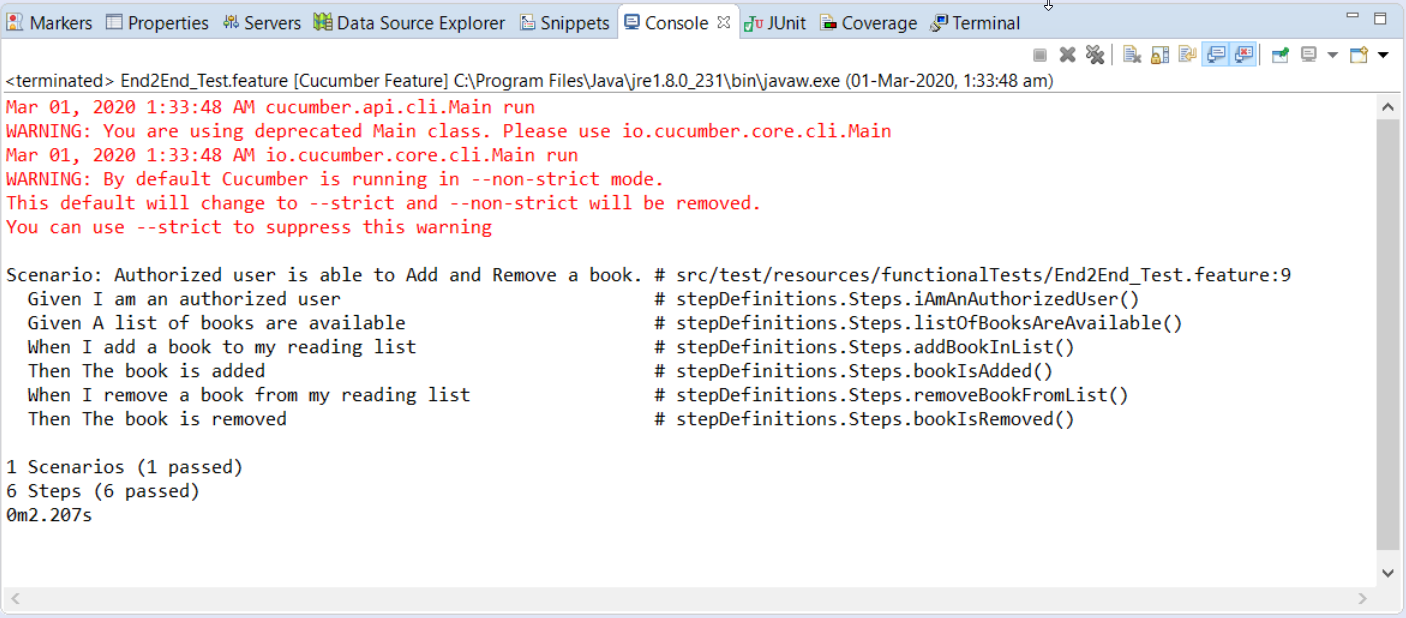
Our tests passed with the changes we made for the conversion of the JSON Response Trunk to Java Object. Please try to implement information technology in your framework, as explained in a higher place, and share your valuable feedback.
After creating the above POJO classes, the project folder structure will look as well:
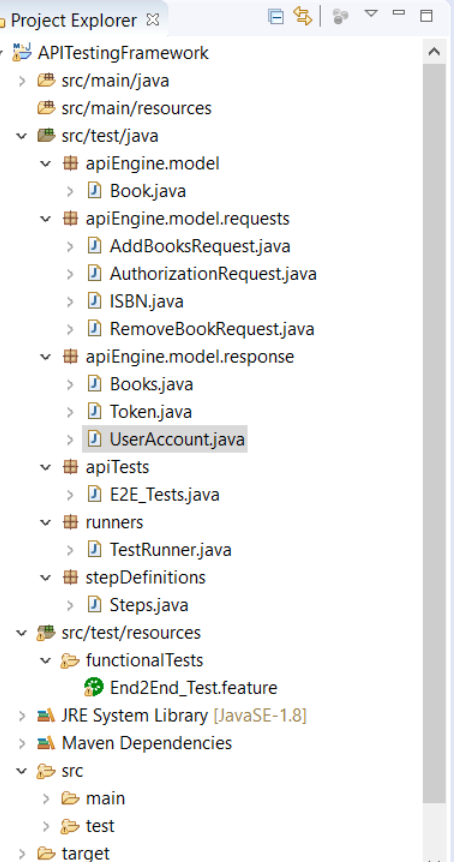
Subsequently, we volition attempt the separation of Test Layer with API Services in our next chapter.
Source: https://www.toolsqa.com/rest-assured/json-response-body-to-java-object/
0 Response to "How to Read Http Response in Java"
Post a Comment